Stuffed teddy bear Matthew

Hello! Meet my new stuffed teddy bear Matthew:

Matthew teddy bear by yoqopody

Matthew is made from white and gray cotton thick fabric and decorated with coconut palm tree robe and coconut shell bottoms. He is  about 35 cm tall and quite slim – 25 cm in his waist.  His arms and legs are moving any directions, connected by cotton thick thread.

If you would like to create your own teddy, here is my post with free pattern you can download and here is some photos from the process. Enjoy it!

stuffed teddy bear


New Teddy Bear with funny name Ushlepysh

Today I will put in my Box With Pretty Things my new teddy bear with funny and unusual name Ushlepysh. The name does not have any meaning, it just sounds fun.

So, here is my new friend:how to sew a teddy bear, free online sewing patterns

Feel free to download the pattern. There are special marks that can help to sew it in right way.

free online sewing patterns, dolls to sew, make teddy bear, toys hand made

The instruction how to sew a teddy bear you can find in my previous post How to make a teddy bear

How to make Teddy Bear – free online sewing patterns. Free Tutorial.

Today I will show how to sew teddy bear. Using my free tutorials and patterns you can easy build you own custom teddy bear toys.
For sewing teddy bear doll you will need to prepare fabric (it can be mohair or cotton or wool, whatever you prefer), scissors, treads and needles, pair of buttons for eyes and good mood.

First you need to download this Teddy Bear Pattern and print it cut the details out.
How to build a teddy bear, download pattern for free

Step 1. Download pattern and cut the pieces.
Put your fabric face down on the table and transform pattern pieces on it. You should have two pieces of head (Detail N1), one piece of head gusset (Detail N2), four pieces of ears (Detail N3), two body pieces (Detail N4), two outer arms (Detail N5), two inner arms (Detail N6), two paw pads (Detail N7), four legs (Detail N8) and two food pads (Detail N9).
free teddy bear pattern, how to build a teddy bear, transform pattern to fabric, sew you custom teddy bear

Step 2. Sew the teddy bear head.

Match two head side pieces together and sew from the tip of the nose down to the neck opening. Match head gusset and sew from point B to points A. Turn the head right side out.
hand made teddy bears, Teddy bears head, teddy bear pattern,

Step 3. Build a teddy bear body.

Match two body pieces and sew it together, but leave one inch on the top
teddy bear body, how to sew a teddy bear, free pattern to download
Turn the body right side out, now you have a teddy bear body and teddy bear head
teddy bear body and teddy bear head, free pattern to download, hand made teddy bear, stuffed dolls, easy toys

Step 4. Sewing teddy bears arms.

Match one paw pad up to the corresponding inner arms and sew them. Point C to point C and point D to point D.
download pattern for free, stuffed dolls, teddy bears, teddy bear pattern, how to sew teddy bear arms

After that sew inner arm with correct outer arm (do double check before sewing) but leave one inch of arm (close to the neck) to turn and stuff.

how to sew teddy bear arms, free tutorials, photo lesson, how to make a teddy bear

After you turn you arms right side out you should have two cute teddy bears arms
how to build a teddy bear, custom made teddy bears, cute teddy bears, hand made teddy bear

Step 5. Sewing teddy bears legs.

Match legs, be sure that each leg has one outer let and one inner leg. Pin and sew them with food pads, and as for arms, leave one inch. Point E to point E and point F to point F.

step by step lesson how to sew a teddy bear, free pattern, cute teddy bear

Step 6. Sewing teddy bear ears and stuffing the doll.

Match and sew ears. Turn all pieces right side out, and stuff all details.
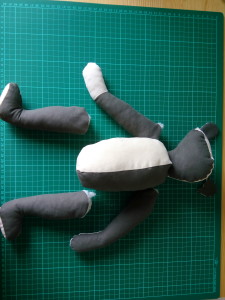
Now we have a teddy bear by pieces:
stuffed teddy bear, how to sew a teddy bear, photo lesson how to build your own teddy bear

Step 7. Making teddy bears eyes.

You will need two buttons, long needle and wide thread.
teddy bears eyes, how to build a teddy bear, free lesson with pattern

With wide thread and long needle do only one stitch for one time. The end of your thread should be on the other side on bears head, coming from eye to the neck. Pull off all your ends and tie with a strong knot.
teddy bears eyes, free pattern to download, buttons for teddy bear eyes\

Do the same for the other eye. Now our cute Teddy Bear can see the world!

teddy bear stuffed doll, how to sew a teddy bear, free tutorials

Step 8. Match the body and the head.

Close the open seam on the top of teddy bear body, stitch it as accurate as possible.
hand made teddy bears, cute teddy bears, how to sew a teddy bear, free pattern

Match you head to the body and stitch two details together. Do it very accurate. In a result you will this:
free patterns, stuffed dolls, sewing the teddy bear

Step 9. Placing arms.

I`m using the same technique, as for placing eyes. with wide thread and long needle
placing teddy bears arms, how to sew a teddy bear, free tutorials, free pattern to download

placing teddy bears arms, how to sew a teddy bear, free tutorials, free pattern to download

placing teddy bears arms, how to sew a teddy bear, free tutorials, free pattern to download

placing teddy bears arms, how to sew a teddy bear, free tutorials, free pattern to download

In a result you teddy bear doll should be able to move its arms.

cute teddy bears, how to sew a teddy bear, free tutorials, stuffed teddy bears

Step 10. Placing legs.

The technique for placing teddy bear legs is totally the same as for placing teddy bears arms.

teddy bears lesson, how to sew a teddy bear, free pattern, placing teddy bears legs, how to build a teddy bears

Now, when you put teddy bears head, body, arms and legs all together, you stuffed doll should be able to stay and looks like this
how to sew a teddy bears, free tutorials, photo lessons, teddy bear pattern

And your teddy bear doll should be able to sit as well

how to sew a teddy bears, free tutorials, photo lessons, teddy bear pattern

Step 11. Placing teddy bear ears.

Choose the right place for ears for your teddy bear and stitch it accurate
teddy bear lessons, how to build a stuffed teddy bear, teddy bear pattern

Step 12. Making teddy bear nose

Stitch the nose for your teddy bear doll for your own design. The easiest way is to make nose as a triangle. Stitch the mouth.
Choose the scarf and wind it round the teddy bears neck.

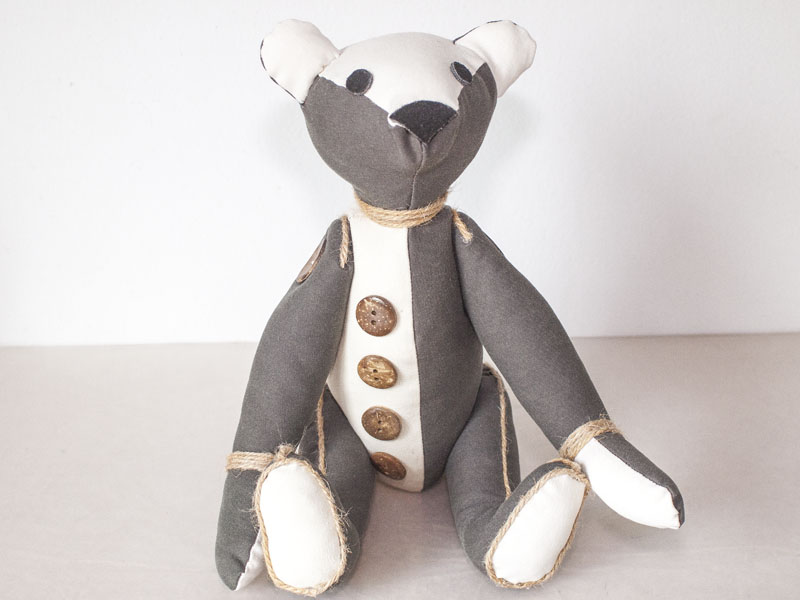
Here you are, nice and really cute teddy bear stuffed doll:

how to sew teddy bears, hand made dolls, make a teddy bear

Step 12. Finishing a teddy bear doll.

In the end I decided to stitch a leather pieces as a food pads
hand made teddy bear, how to sew teddy bear, free teddy bear pattern

So, what else you have to do?…. Oh, right, you need to pick a name for your new teddy bear doll. I called mine Authentic Teddy Bear:
stuffed teddy bears dolls, photo lesson how to build a teddy bear

April Teddy Bear

Today was a last day of April month, pretty good month for me and Dima. I like April month, there is something special about it, but it always something special.
Today I made Teddy Bear by my hand and gave him a name, meet April!

hand made teddy bear

Because I`m still learning how to do a teddy bears, so April is made from cotton fabric and sewn by hand.

Actually it is very easy to make a teddy bear, if you have any experience with sewing, making your own teddy bear will not take a lot of time, but you definitely will need a patience.

If you liked April Teddy Bear and would like to do it by your self, fell free to download patter (for free, no charge, my friends) and follow easy instructions.

free pattern

How to sew a Teddy Bear.

First you need to print the pattern (size of A4) and cut out the pieces. Put your fabric face down on the table and transform pattern pieces on it. You should have two pieces of head (Detail N1), one piece of head gusset (Detail N2), four pieces of ears (Detail N3), two body pieces (Detail N4), two inner arms (Detail N5), two paw pads (Detail N6), two outer arms (Detail N7), four legs (Detail N8) and two food pads (Detail N9).

Match two head side pieces together and sew from the tip of the nose down to the neck opening. Match head gusset and sew from point A to points B. Match two body pieces and sew it together, but leave one inch on the top. Match and sew ears. Match one paw pad up to the corresponding inner arms and sew them. After that sew inner arm with correct outer arm (do double check before sewing) but leave one inch of arm (close to the neck) to turn and stuff. Match legs, be sure that each leg has one outer let and one inner leg. Pin and sew them with food pads, and as for arms, leave one inch.

Turn all pieces right side out, and stuff all details.

For making eyes you can use ordinary buttons or, if you have one, special glass eyes. Use long needle, long enough to sew through the head and fix the eyes on the position. With wide thread and long needle do only one stitch for one time. The end of your thread should be on the other side on bears head, coming from eye to the neck. Pull off all your ends and tie with a strong knot.

You can stitch nose and mouth in different ways, but for April I prefer to leave as it is.
To join body, head and limbs professional teddy makers use different accessories. But I, as a beginner, use the same technique, as I used for placing eyes. Join head and body and carefully sew them together. Take a wide thread a long needle and join arms and legs before closing open seams. When you arms and legs on their places, you can close the seams with accurate stitching.

Join the ears and you teddy bear is ready! Enjoy!

Next time I will do a step-by-step lesson with picture “How to make a Teddy Bear”, so stay tuned!